How to Build a Deck: A Step-by-Step Guide
Building a deck is a great way to expand your outdoor living space. Whether it’s a place to relax, entertain friends or family or just enjoy the fresh air, a well-built deck adds both function and value to your home. Carefully planning the right materials, and solid construction techniques will make your project smoother.
If you're unsure where to begin, a deck planning tool like the RedX Deck app can be a great help. It allows you to map out your deck design, estimate the materials you'll need, generate a precise cut list, and ensure accurate measurements, making the entire process smoother and more efficient before you even pick up a tool.
1. Plan Your Deck
Before picking up any tools, take some time to consider:
- Size & Layout: How big should the deck be? Where will it fit best?
- Materials: Pressure-treated wood is a common choice, but composite and PVC offer low-maintenance alternatives.
- Permits & Codes: Check local regulations to ensure your deck meets building codes.
- Board Orientation: Confirm your deck design and the planned orientation of your deck boards before starting the joist work. The direction of your boards will determine how the joists are spaced and positioned.
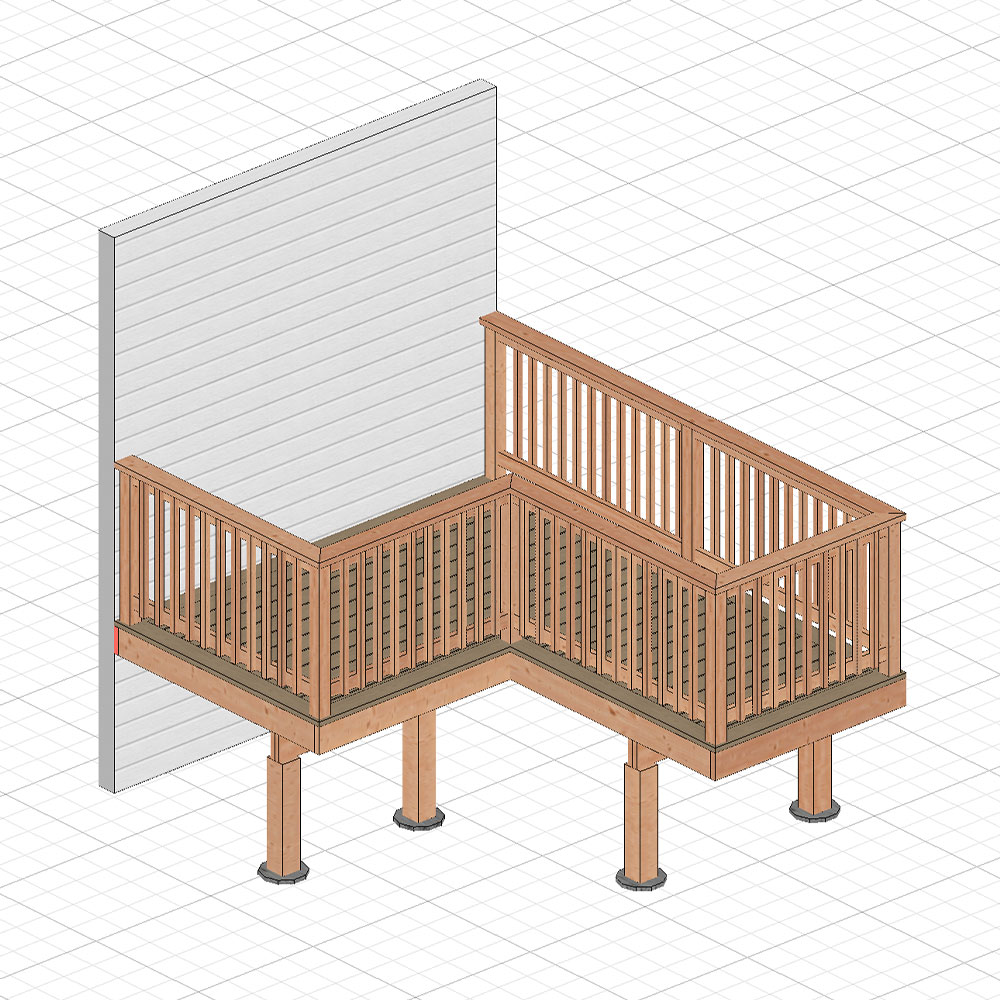
- Railing & Other Features: Decide whether you’ll need railings, stairs, or any special design elements like built-in seating.
It's important to determine the total deck size and estimate the materials required before planning the deck joist spacing and blocking. Finalizing these details early will help streamline the construction process.
 2. Inspect & Prepare Your Framing – For Rebuilding an Existing Deck
If you are rebuilding an existing deck, it's crucial to assess the current framing before moving forward with new construction.
- Check for Structural Integrity: Look for soft spots, cracks, or damage caused by moisture or exposure.
- Inspect for Rot & Damage: Identify any broken pieces, splits, or wood rot that could weaken the deck’s stability.
- Examine Fasteners: Ensure all screws, bolts, and hardware are secure and free from corrosion.
- Assess Lumber Contraction: Wood can shrink over time, which may affect the overall structure. Check for any misalignment or gaps in framing components.
If the existing frame is still in good condition, you can proceed with installing new decking. However, if the framing shows significant damage, replacement may be necessary to ensure a safe and long-lasting deck.
3. Gather Your Tools & Materials
Getting everything ready ahead of time makes the process much easier. You’ll need:
- ✔ Measuring tape & level
- ✔ Circular saw & drill
- ✔ Screws & joist hangers
- ✔ Post-hole digger & concrete mix
- ✔ Lumber
- ✔ Decking Boards
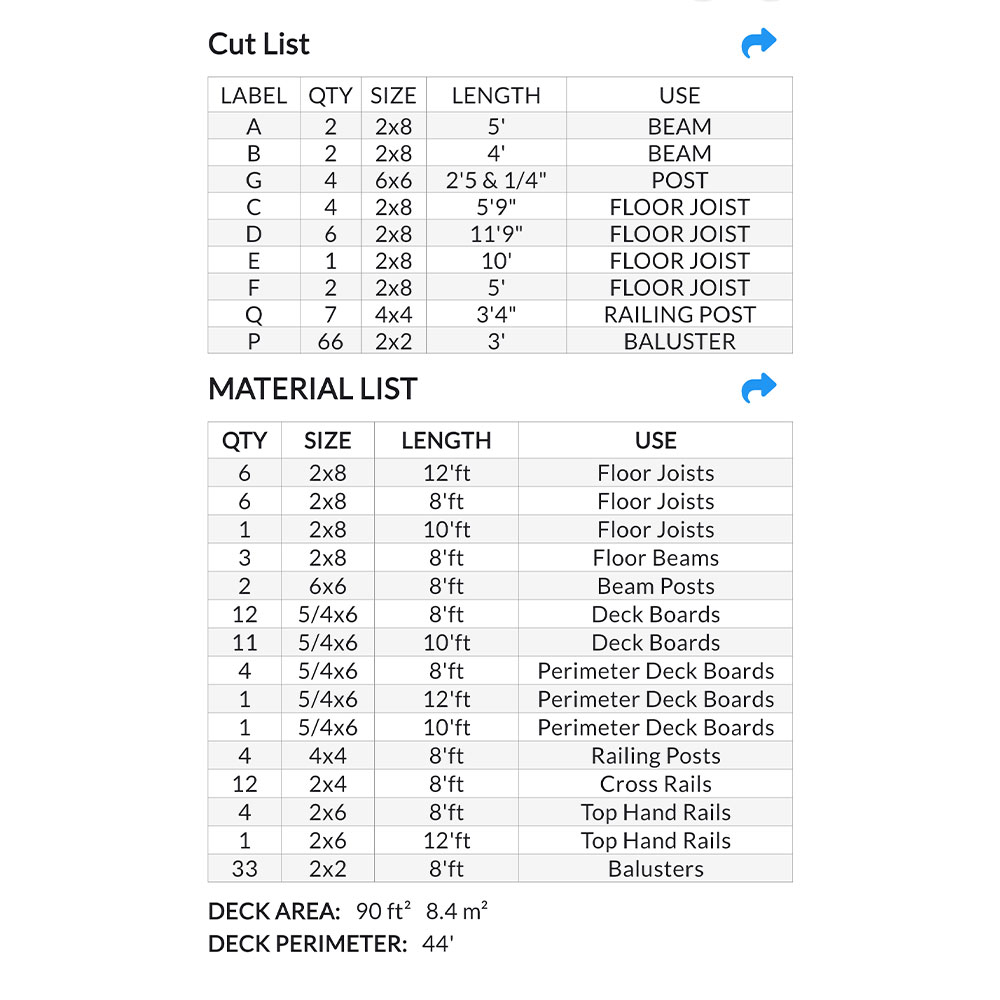
A planning tool that generates a precise material list based on your deck’s dimensions helps ensure you purchase the right amount of supplies. The RedX Deck app offers an efficient way to achieve this with accuracy and ease
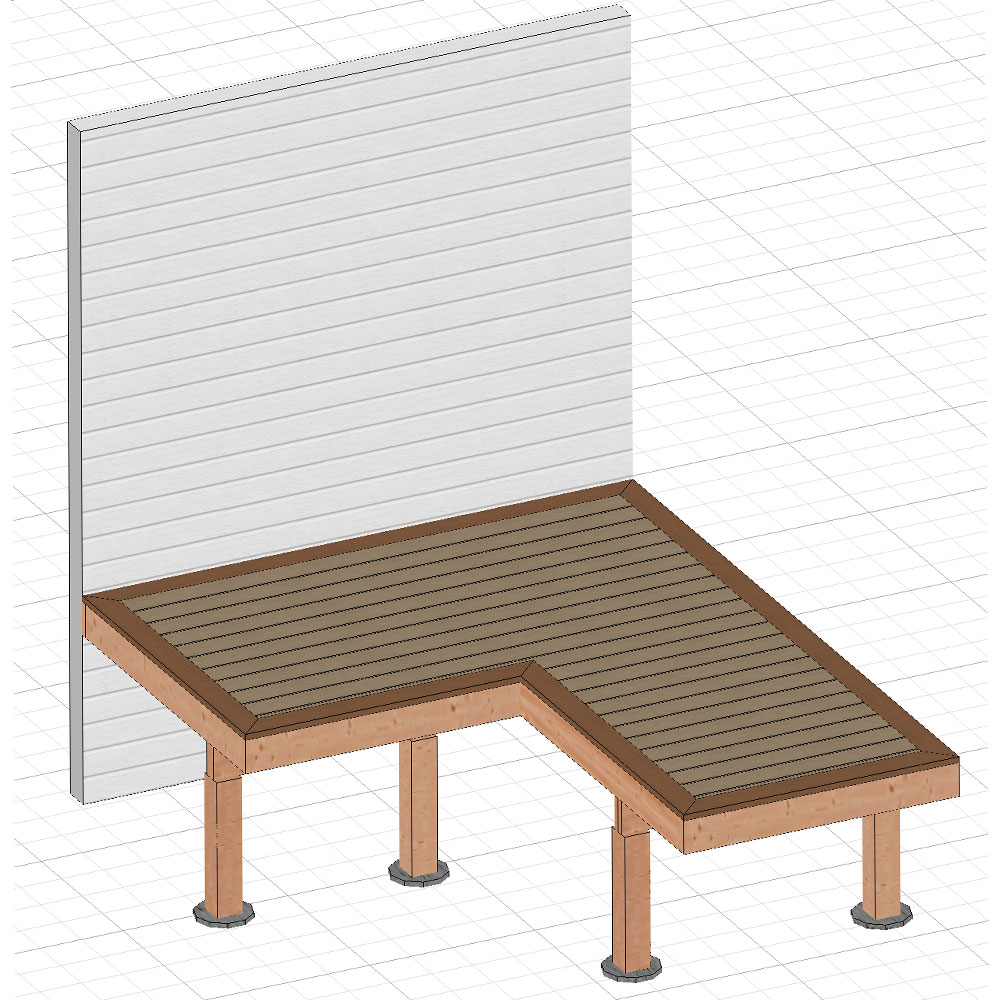
4. Build the Foundation
- Mark the deck’s layout using stakes and string to ensure proper alignment.
- The frost line, also known as the freeze line, is the depth at which the ground freezes during winter. It varies depending on your geographic location and climate. In colder regions, the frost line can be as deep as 4 feet or more, while in warmer areas, it may only be a few inches deep.To ensure stability, it's important to dig post holes below the frost line to prevent the posts from shifting due to freezing and thawing. You can check local building codes or consult with a professional to determine the frost line depth for your area.
- Pour concrete into the holes and let it fully cure before attaching post anchors.
Taking the time to get the foundation right will ensure your deck remains sturdy for years.
5. Frame the Deck & Install Blocking
- Attach a ledger board to the house for support.
- Install posts and beams onto the footings.
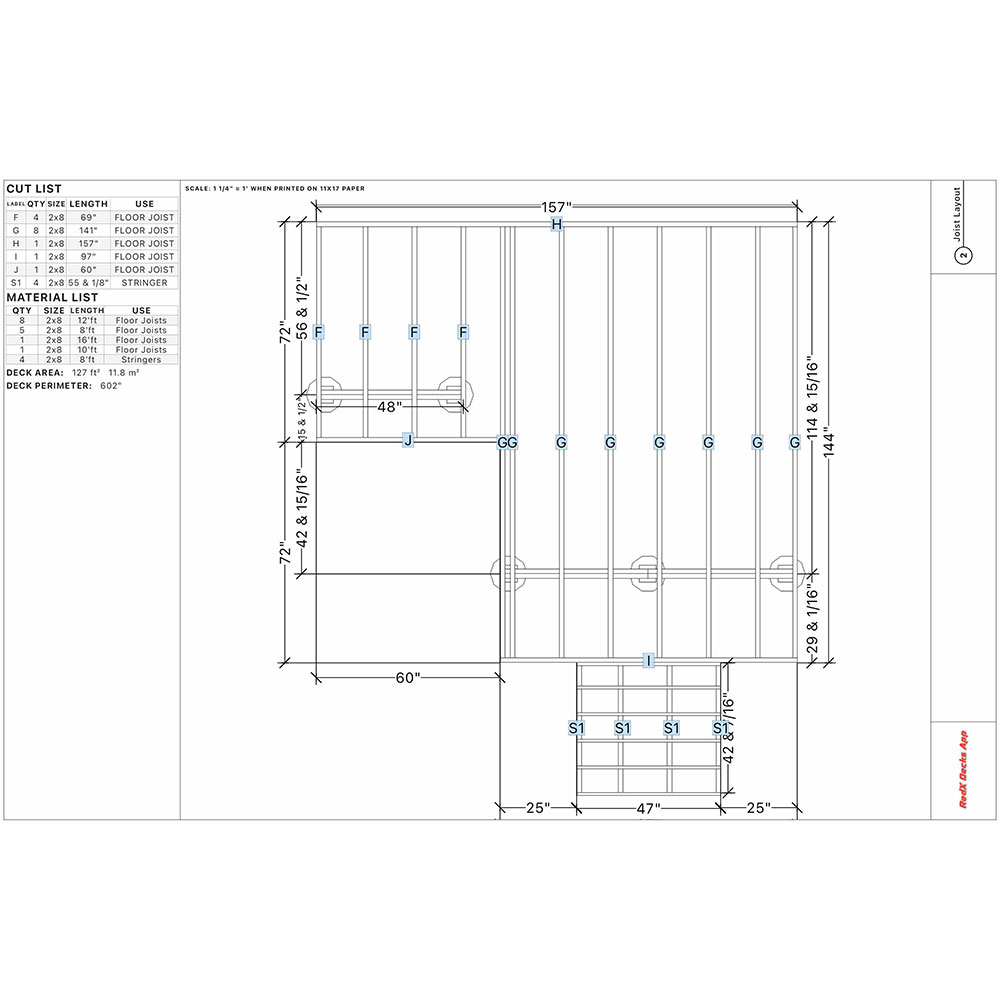
- Secure joists across the frame, keeping them evenly spaced for proper support.
Important: Deck joist spacing should never exceed 16″ on center (except for MAX deck boards, which allow up to 24″ on center). Ensuring proper joist spacing will prevent sagging and structural issues.
Before installing any decking, it’s critical to ensure all joists are level. Run a string line frequently to check that the tops of the joists are plane and level. Even if a joist is level itself, it may still be higher or lower than surrounding joists, creating high or low spots that can result in a wavy-looking deck.
Look for any uneven joists and adjust them as needed before proceeding.
Different deck board patterns, such as picture frame borders or diagonal inlays, may require additional blocking and framing. Planning these design elements in advance will help ensure structural integrity.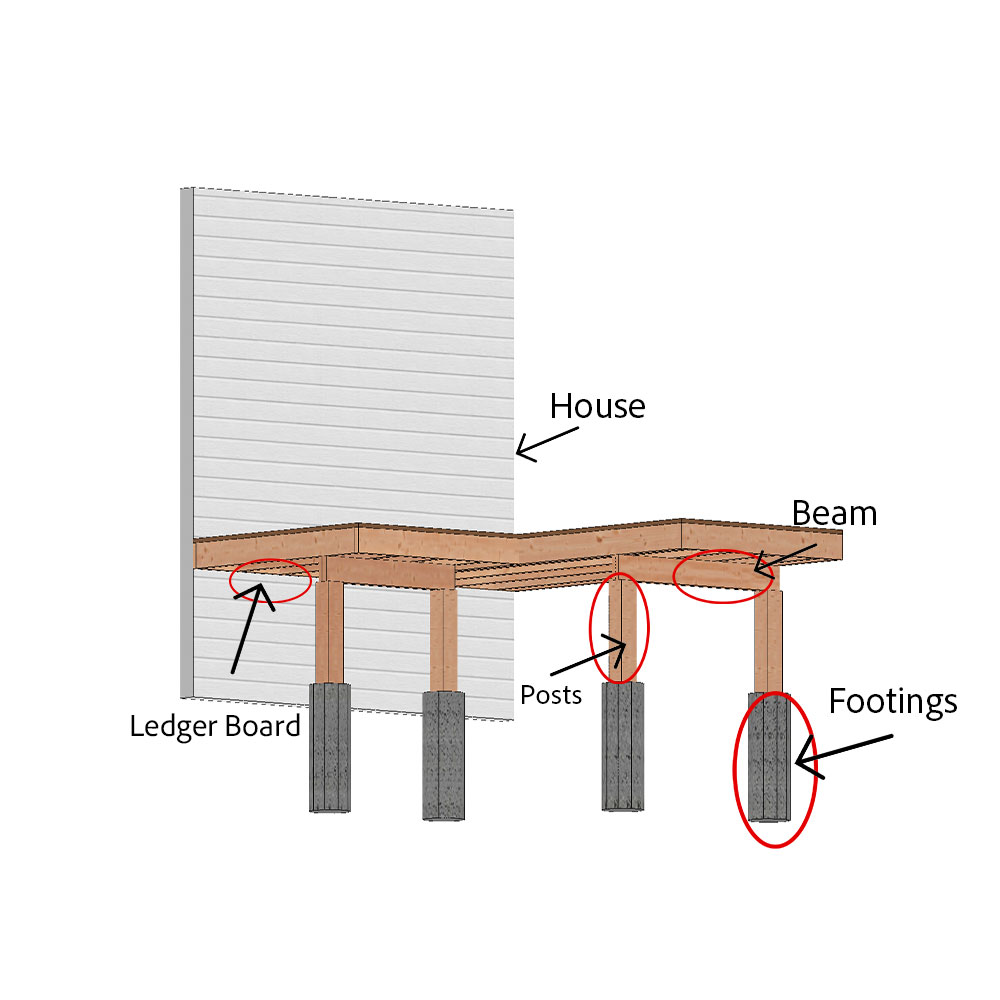 5. Installing Blocking
Blocking is a crucial step in deck construction, as it helps prevent joists from twisting and enhances overall stability. Install edge-to-edge blocking between joists, especially in areas with longer spans, to create a continuous line of support. This prevents sagging and ensures stability across the deck.
Solid wood blocking should be spaced evenly in rows, with a maximum distance of 4′ to 6′ apart, to distribute the load evenly and avoid weak or sagging areas. This arrangement strengthens the deck frame, ensuring it can safely support the weight of the decking boards and any furniture or people.
Use exterior-grade fasteners to secure the blocking through the outside of the joists. Depending on the deck material and fasteners, additional blocking may be necessary at butt joints or seams for proper fastening. Finally, ensure all blocking is level and flush for a solid surface to attach the decking boards.
Additionally, ensure that all framing components are secured with exterior-grade fasteners. Some sections of the deck may require additional fasteners to reinforce existing framing, ensuring durability over time.
6. Install the Deck Boards
- Start at the house and work outward, keeping boards aligned.
- Leave small gaps between the decking boards to allow for water drainage and proper airflow. A recommended gap size is typically 1/8 to 1/4 inch between each board. This spacing helps prevent water from pooling on the surface, reduces the risk of mold and mildew, and allows the wood to expand and contract with changing weather conditions.
- Secure with screws or hidden fasteners for a clean finish.
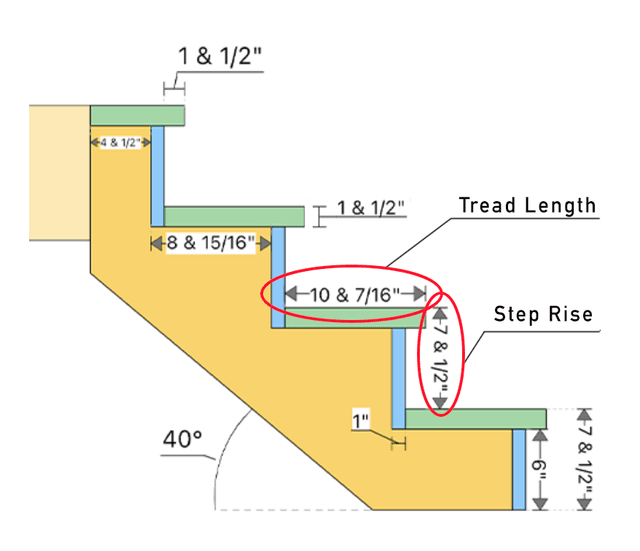
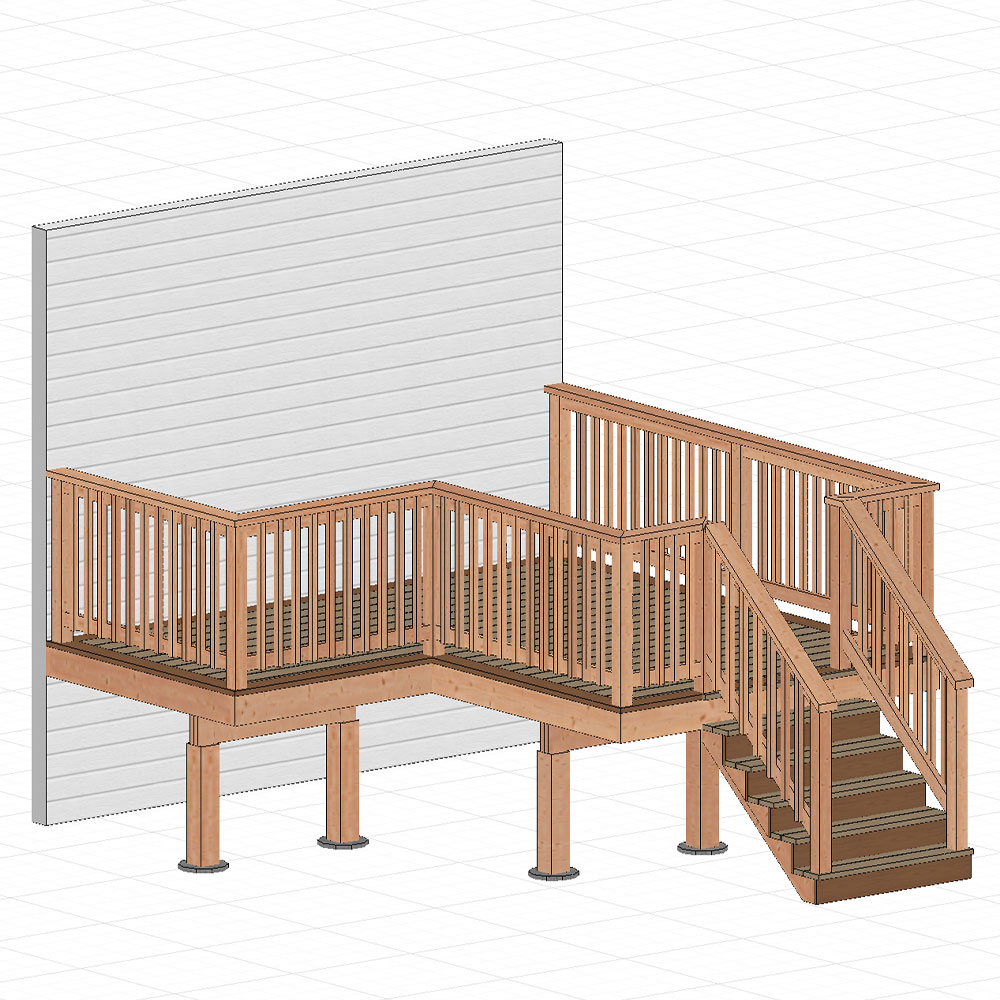
7. Add Stairs & Railings (If Needed)
- Stairs should be evenly spaced and properly supported.
- Railings provide safety and should be built to meet local codes.
For stair calculations, using a tool like the RedX Stairs app can simplify the process of determining stringer cuts and step heights, making your design work more efficient.
8. Finishing Touches
- Sand rough edges to prevent splinters.
- Apply a wood sealer or stain for protection.
- Clean up the area, and your deck is ready to enjoy!
Final Thoughts
Building a deck is a fulfilling project that adds value to your home. Whether you’re using traditional techniques or leveraging digital tools for planning and materials, taking the time to complete each step carefully will result in a durable, long-lasting outdoor space.