
How to Frame a Wall: A Complete Step-by-Step Guide
What is Wall Framing?
Wall framing is the process of building the structural skeleton of a wall using lumber. A standard framed wall consists of a horizontal bottom plate (also called a sole plate) fastened to the floor, vertical studs spaced at regular intervals, and a horizontal top plate that connects the studs at the top. In most residential construction, a second top plate (the double top plate) is added to tie walls together at corners and intersections.
The most common lumber for wall framing is 2x4 for interior walls and standard exterior walls, or 2x6 for exterior walls that require thicker insulation. Studs are typically spaced 16 inches on center for load-bearing walls and 16 or 24 inches on center for non-load-bearing partitions. The framing also includes specialized components around openings: king studs, jack studs (trimmers), headers, rough sills, and cripple studs.
Getting the stud layout right before you start cutting is the most important part of the job. Spacing errors compound across the wall and cause problems when you hang sheathing, drywall, or siding. Many builders now use a wall framing calculator to generate the stud positions, mark every opening, and produce a cut list before construction begins. This eliminates layout mistakes and gives you an exact material count.
Tools and Materials You Need
Tools
- Tape measure (25-foot minimum)
- Chalk line
- Circular saw or miter saw
- Framing hammer (22 oz) or framing nailer
- 4-foot level
- Speed square
- Pencil
- Clamps (for holding plates together while marking)
Materials
- 2x4 or 2x6 studs (precut 92-5/8" for 8-foot walls)
- 2x4 or 2x6 plates (top plate, bottom plate, double top plate)
- Header material (doubled 2x6 to 2x12 depending on span)
- 16d framing nails or 3-1/2" framing screws
- 1/2" plywood or OSB spacer for headers
Pro tip: Before buying materials, use a wall framing calculator to generate a cut list with exact quantities. It counts every stud, plate, header, jack stud, and cripple so you buy exactly what you need and avoid extra trips to the lumber yard.
How to Frame a Wall: Step by Step
Plan Your Wall Layout
Start by determining where the wall will go. Measure the wall length and ceiling height. Decide on stud spacing: 16 inches on center is standard for load-bearing walls, 24 inches on center is acceptable for some non-load-bearing partitions. Identify where doors, windows, and intersecting walls will be.
Snap a chalk line on the floor to mark the bottom plate position. Use a plumb bob or laser level to transfer this line to the ceiling for the top plate. Make sure the wall is square to adjacent walls by checking the 3-4-5 triangle method.
Using software: A wall framing calculator lets you enter the wall length, height, spacing, and all your openings. It generates the complete stud layout visually so you can see every stud position, header, and cripple before you make a single cut. You can try different configurations instantly instead of erasing and re-marking plates.
Cut and Mark the Top and Bottom Plates
Cut two pieces of lumber (2x4 or 2x6) to the full wall length. These are your top plate and bottom plate. Lay them side by side on a flat surface and clamp them together so the ends are flush.
Starting from one end, hook your tape and mark at 15-1/4 inches for the first stud (this puts the edge at 16 inches on center from the end of the wall). Then mark every 16 inches from there. Draw a line at each mark and put an X on the side where the stud will sit. Mark both plates at the same time to ensure alignment.
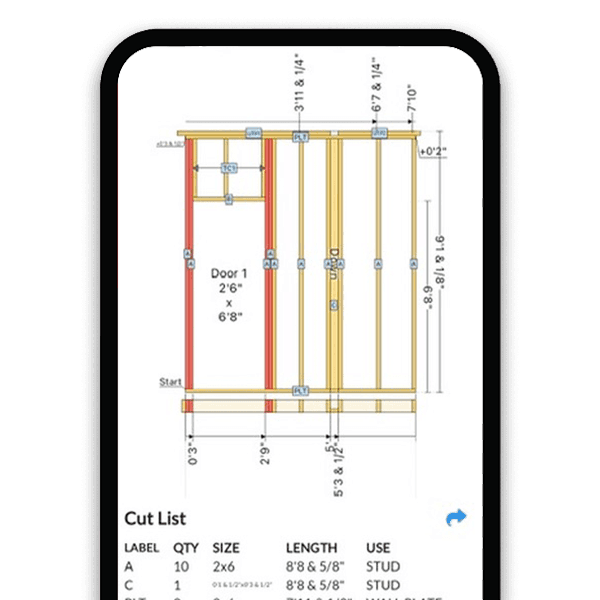
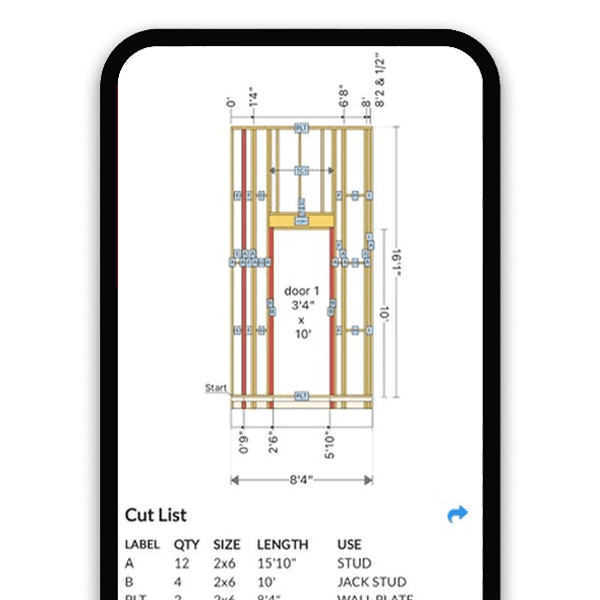
Mark the locations of doors and windows on the plates as well. You will need to know where king studs, jack studs, and cripples go. If you are using a wall framing calculator, it marks all of these positions for you and you can print the layout as a reference.
Cut the Studs to Length
For a standard 8-foot ceiling, precut studs at 92-5/8 inches work with a single bottom plate and double top plate (three plates at 1-1/2 inches each = 4-1/2 inches, plus 92-5/8 inches = 97-1/8 inches, just under 8 feet with room for drywall and flooring).
For non-standard ceiling heights, calculate the stud length by taking the floor-to-ceiling measurement and subtracting the combined thickness of all plates. If you are building with a single top plate, subtract 3 inches (two plates). With a double top plate, subtract 4-1/2 inches (three plates).
Cut all your common studs to the same length at once. Set up a stop block on your saw for consistent cuts. Jack studs, cripples, and other components will have different lengths that depend on your opening sizes and header dimensions.
Frame Door and Window Openings
Openings are the most complex part of wall framing. Each opening requires several specialized framing members:
- King studs - full-height studs on each side of the opening, nailed to the plates like regular studs.
- Jack studs (trimmers) - shorter studs nailed to the inside of the king studs. They support the header. Their length equals the rough opening height.
- Header - a horizontal beam across the top of the opening. Built from doubled lumber (2x6 to 2x12 depending on span) with a 1/2-inch plywood spacer to match the stud wall width.
- Cripple studs - short studs above the header that maintain the 16-inch layout, and short studs below the rough sill for windows.
- Rough sill - a horizontal piece at the bottom of a window opening, supported by cripple studs below it.
Header sizing depends on the span and the load above. For a non-load-bearing wall, a flat 2x4 works as a header. For load-bearing walls, common sizes are: 2x6 header for openings up to 4 feet, 2x8 for up to 6 feet, 2x10 for up to 8 feet, and 2x12 for up to 10 feet. Always verify with your local building code or a structural engineer for load-bearing walls.
Using software: This is where a wall framing calculator saves the most time. Add a door or window opening and it automatically places the king studs, jack studs, header, cripples, and rough sill. It also calculates every piece length for the cut list so you do not have to figure out jack stud heights or cripple lengths manually.
Assemble the Wall on the Floor
Lay the bottom plate and top plate on edge on the subfloor, parallel to each other, with the marked faces up. Place studs between the plates at each marked position.
Drive two 16d nails (or 3-1/2 inch screws) through each plate into the end grain of every stud. For king studs and jack studs, nail the jack stud to the king stud with 10d nails every 16 inches before installing them. Set the header on top of the jack studs and nail through the king studs into the header ends.
After assembly, check that the wall is square by measuring both diagonals. If they are equal, the wall is square. If not, push the longer diagonal corner until they match. This step is critical: an out-of-square wall creates problems with sheathing, drywall, and trim.
Raise, Plumb, and Secure the Wall
With a helper, tilt the wall up into position along the chalk line. Slide the bottom plate to the line and tack it in place with a couple of nails.
Place a 4-foot level against a stud near each end and check for plumb. Adjust by tapping the top plate left or right. Brace the wall temporarily with a diagonal 2x4 nailed to a stud and the floor.
Once plumb, nail the bottom plate to the floor joists or subfloor with 16d nails every 16 inches. If the wall sits on concrete, use a pressure-treated bottom plate and anchor it with concrete screws or powder-actuated fasteners.
Finally, add the double top plate. Cut it so joints are offset at least 4 feet from the first top plate joints. The double top plate overlaps at corners and intersections to tie walls together. Nail it to the first top plate with 10d nails every 16 inches, staggered.
Plan Your Wall Before You Build It
Common Wall Framing Mistakes to Avoid
Not checking for plumb and square
An out-of-plumb wall causes cascading problems: crooked door frames, gaps in drywall, and uneven trim. Always check plumb at both ends before bracing, and measure diagonals before raising.
Wrong stud spacing at the first stud
The first stud is not 16 inches from the end of the plate. It is placed so that the center of the first standard stud bay is at 16 inches. This means the first stud edge is at 15-1/4 inches. If you start at 16 inches from the end, every sheathing and drywall panel after the first one will not land on a stud.
Undersized headers
Using a header that is too small for the span is a structural risk. A 2x6 header works for openings up to about 4 feet. Wider openings need 2x8, 2x10, or 2x12 headers. For load-bearing walls, always reference your local code span tables or consult an engineer.
Forgetting cripple studs
Cripple studs above headers and below window sills maintain the on-center stud layout. Without them, you will not have nailing surfaces for sheathing and drywall in those areas. They also help transfer loads from the top plate through the header.
Not accounting for the bottom plate at doorways
When framing a wall with a door, build the wall with the bottom plate running continuously (including through the door opening). Cut out the plate section in the doorway after the wall is raised and secured. If you leave the plate out during assembly, the wall will be harder to keep straight and square.
Types of Walls You Can Frame
The basic framing process described above applies to straight walls. But not every wall in a building is straight and uniform. Here are the most common wall types and what makes them different:
Straight walls (exterior and interior)
Uniform stud heights, standard spacing. This is the wall type covered in the steps above. Interior partition walls are usually non-load-bearing and may use 24-inch spacing.
Rake walls (gable ends)
The top plate follows the roof slope, so every stud is a different length with a bevel cut at the top. Manual calculation requires trigonometry for each stud. A rake wall calculator computes every length and bevel angle automatically.
Tall walls
Walls taller than 10 feet often require doubled studs, closer spacing, or larger lumber (2x6 instead of 2x4) to meet structural and fire-code requirements. They may also need mid-height blocking.
Single-slope walls
Used for lean-to structures and sheds where one side of the wall is taller than the other. Each stud has a progressively different height. Similar to rake walls, the math is easiest with a calculator.
Visualize Every Wall Type Before You Build
Wall Framing FAQ
What tools do I need to frame a wall?
At minimum you need a framing hammer or nail gun, circular saw, tape measure, speed square, chalk line, level, and a pencil. A framing nailer speeds up the work significantly. For layout, you will also want a string line and a plumb bob or laser level. If you are cutting a lot of studs, a miter saw or chop saw makes repetitive cuts faster and more accurate.
What is standard stud spacing for wall framing?
Standard stud spacing is 16 inches on center (OC) for most residential wall framing. Non-load-bearing interior walls sometimes use 24-inch spacing. Load-bearing walls, walls supporting heavy finishes like stone veneer, and exterior walls in high-wind zones typically require 16-inch or 12-inch spacing. Always check your local building code.
What size lumber do I need to frame a wall?
Most residential wall framing uses 2x4 lumber for standard 8-foot walls. Use 2x6 studs for exterior walls that need R-19 or higher insulation, walls taller than 10 feet, or load-bearing walls carrying significant loads. Plates are the same width as the studs. Headers are typically built from doubled 2x6, 2x8, 2x10, or 2x12 lumber depending on the span.
How do I frame around a window opening?
A window opening requires king studs (full-height studs on each side of the opening), jack studs (trimmer studs that support the header), a header across the top sized for the span and load, a rough sill at the bottom of the window, and cripple studs above the header and below the sill. The rough opening should be 1/2 inch wider and taller than the window unit.
How do I know if a wall is load-bearing?
A wall is load-bearing if it supports weight from the structure above - the roof, upper floors, or ceiling joists. Clues include: the wall runs perpendicular to floor or ceiling joists, it sits directly above a beam or foundation wall, or it is an exterior wall. Walls running parallel to joists with no structural connection above are usually non-load-bearing partitions. When in doubt, consult a structural engineer before removing any wall.
What is a rake wall and when do I need one?
A rake wall is a wall where the top plate follows the slope of the roof, creating a triangular or trapezoidal shape. You see them at gable ends of a house. Each stud in a rake wall has a different length and a bevel cut at the top to match the roof pitch. A rake wall calculator can compute every stud length and angle automatically.
Should I build the wall on the floor or assemble it in place?
Building the wall flat on the subfloor and tilting it up is the standard method for new construction. It is faster, more accurate, and easier to nail through the plates. Assembling in place (toe-nailing studs between existing plates) is used when working in tight spaces or adding a wall in a finished room where there is no room to tilt up a full wall.
How many studs do I need for a wall?
For 16-inch on-center spacing, take your wall length in feet and multiply by 0.75, then add 1 for the starting stud. A 10-foot wall needs about 9 studs. But that count only covers the field studs. You also need extra studs for corners, intersecting walls, door and window openings (king studs, jack studs, cripples). A wall framing calculator counts every piece automatically.
How tall is a standard framed wall?
A standard framed wall is 8 feet (96 inches) from finished floor to ceiling. The studs themselves are 92-5/8 inches long (precut studs), which accounts for three plates: one bottom plate and a doubled top plate, each 1.5 inches thick (92.625 + 4.5 = 97.125 inches, leaving room for flooring and ceiling finish). Some homes use 9-foot or 10-foot walls for a more open feel, which require longer studs.
What is the difference between a header and a beam?
A header is a horizontal framing member that spans an opening (door or window) in a wall and transfers the load above the opening to the jack studs on each side. A beam is a larger structural member that spans longer distances and carries loads from the roof or floor above, often supported by posts or columns. Headers are typically doubled 2x lumber, while beams can be solid timber, LVL (laminated veneer lumber), or steel.
Learn More
Ready to Frame Your Wall?
Plan your entire wall layout before you cut a single board. The RedX wall framing calculator generates stud positions, cut lists, and printable blueprints for any wall type. Free to use on web, iOS, and Android.